How To Use The Facebook Pixel

A Complete Guide

Track Your Advertising Results and Increase Conversions with this complete guide on installing the Facebook pixel.

Facebook advertising is always changing at lightening speed. And unless you’re inside of the trenches day in and day out, it can be hard to keep up.

So let me breakdown the mysterious pixel for you in a way that’s easy to understand and implement.

Then you can spend more time working on your business and less time demystifying shit that you probably don’t even have time for as it is.

This guide will answer the following questions:

1

What the heck is a pixel anyway?
2

The 3 Reasons Why Tracking Pixels Are So Important
3

The Facebook Pixel
4

How to place your pixel in WordPress/ClickFunnels/LeadPages
5

Two main types of Conversion Tracking pixel modifications
6

Testing Your Pixels

When you start runnings ads with Facebook, it’s key to set strategic objectives for advertising that are measurable. To know exactly how your ads generate revenue.

If your ads aren’t directly generating revenue—in the short, or long term—stop spending time and money on those particular ads.

Now picture this:

You COULD spend time creating fancy spreadsheets aiming to track all your advertising efforts manually… (Pulling audience data, exporting reports, comparing hundreds to thousands of ad variations and then comparing that against the customer data in your Infusionsoft, or MailChimp, or Active Campaign).

OR… You could just let Facebook do your bidding!

Let’s go with option #2.

Enter the Facebook Tracking Pixel.

Using data from Facebook AND when a user leaves the site, tracking pixels tell us the ENTIRE story from start to finish. Tracking the ENTIRE customer journey; even when parts of that journey happen away from Facebook.

What the Heck is a Pixel Anyway?

Let me start with the complete technical description of a pixel, and then break it down in a way that everyone can understand.

In technical terms:

“A tracking pixel is simply code inserted into custom or third-party creative that makes a server call and returns a transparent 1×1 image.”

** Screeching halt ** Wait… WHAT???

So let’s try it this way:

A pixel is a tiny image on your website. It’s way too small for anyone to see and even if they could see it, well… it’s transparent anyway.

You place that image on a site using a simple snippet of HTML code that Facebook provides. (Visually it’s a really bizarre string of letters and numbers that make NO SENSE upon first glance).

And then each time that tiny image loads (aka the HTML code loads) when someone visits your page…

It fires. Like a flare gun.

That flare is your website yelling:

“Hey Facebook, important shit is happening here! Record it!”

It’s this tracking ability—and what we can do with that information later—that makes Facebook advertising So. Freaking. Powerful.

The pixel tracks the exact actions people are taking after seeing your ads.

YOU’LL know who:

  • Visits your site
  • Signs up for your email list
  • Opts into your freebies
  • Shows interest in your products and services, or…
  • Becomes a new customers…

…as a result.

This information will help you to to create a strategic plan that grows your audience resulting in more paying customers.

3 Reasons to Use Tracking Pixels

  1. Measure Your ROI
  2. Improve Your Results
  3. Retarget & Close More Sales

With the Facebook pixel, you’ll easily measure the number of results** your ads generate.

**For reference: I’m going to refer to these results as conversions from now on.

Measure Your ROI

The pixel is tracking conversions.

These conversions will tell you how much you’re spending on:

Cost per Email Lead

How much you spent to attract a new email subscriber to your list… through your lead magnets and opt ins.

Cost per Sale

How much you spend to acquire a brand new customer.

When it costs us less to attract a new customer than the revenue that they generate. We are profitable.

Because no one in their right mind would spend $200 to attract a new customer who will only ever be worth $100 in revenue.

NO ONE.

(Seriously… don’t try and be a jackass just to prove me wrong)

Thanks to the Facebook tracking pixel…. We’ll never have to be THAT GUY again.

Improve Your Results

You can’t improve what you can’t measure.

If you don’t measure:

How can you know if you’re on track to hit your sales goals?

How do you know if you’re making money on ads?

(Or if you’re better off just lighting it on fire because it’s less painful and cheaper!)

The Facebook tracking pixel lets you measure exactly what people do after they click your ad.

Then when you know what’s working…

It’s a matter of doing more of those successful actions.

And what about what’s NOT working?

Cut that shit completely.

More results.

Less money.

We’re on to something here!

Retarget & Close More Sales

Finally, retargeting.

Retargeting is just a different way of saying:

“Reminder marketing to people who have visited your website in the past”.

Think of how many websites you visit then get distracted and wake up from your browser blackout 20 minutes later having already forgot about that cute bracelet you wanted to buy.

This is an indication that someone’s shown an interest in your brand, but didn’t complete an action (like making a purchase or subscribing to your email list).

You know… the IMPORTANT things.

By using the Facebook tracking pixel, we can identify who those visitors were and stalk them until they come back.

Kidding. (Or am I?)

The more civilized thing to do is to present past visitors with timely Facebook ad reminders via retargeting to trigger them into taking like subscribing to your list or buying your products).

Here’s a fun fact:

Website visitors who are retargeted with ads are 70% more likely to convert on your website.

I’d tell Victoria Emerson to ‘fuck right off’ with their reminder marketing, if I wasn’t completely obsessed with their retargeting campaigns (Seriously… I own 5. It’s an obsession)

For example, if somebody’s read a blog post on your site where you presented them the opportunity to exchange their email address for additional free, valuable content but they didn’t. You can present them a Facebook ad that reminds them of your lead magnet via retargeting.
Straight up, this method WORKS!

You can take retargeting to some pretty incredible limits as you go along by segmenting your audience based on which ads they’re clicking and which pages they’re landing on.

We’ll get into that in future posts.

The Facebook Pixel

Going back to that snippet of HTML code mentioned earlier.

(It’s time to make it less scary).

Ready?

Let’s jump into your ad account.

And we’re gonna hunt down your HTML Facebook pixel.

My nerdy term for this HTML snippet is: The Base Code. This is the code that ‘talks’ to Facebook behind the scenes.

You’ll install it on EVERY. SINGLE. PAGE. of your site.

If a person finds your site through:

  • Email marketing
  • Social media
  • Google search
  • An advertisement
  • You name it!
With the pixel, ANYONE who hits a page on your site… Facebook knows about it.

Preparing Your Facebook Base Pixel

Let’s jump into a tutorial on how to generate your base pixel and get things ready to roll.

If you already have your pixel created, you’ll just need to grab it from your Pixel Dashboard.

Go ahead and steal that cheat sheet right now.
It’s a Google Doc and doesn’t require an email address.

Placing Your Base Pixel

WordPress Placement

No, I won’t show you how to install your Facebook pixel across your entire WordPress website because it’s legit different for each and every theme.

Generally, you’d go to your theme options & settings and place it in the Facebook pixel code field.

Most themes are savvy enough that they have this option available and make it easy as pie.

And, on the off chance that they don’t, consult with a developer to install the pixel code before the </head> tags across your entire site.

If you can’t figure out where the Facebook pixel goes within your theme, download and install one of the following WordPress plugins:

You’ll only need to do this once.

ClickFunnels Placement

In order to add the Facebook base pixel on EVERY page of your funnel:

  1. From the funnel level within ClickFunnels, click on Settings.
  2. Paste your pixel in the “Head Tracking Code” section.
  3. Scroll down the page and click on Save and Update Settings.

This is the landing page software we use at The Ad Strategist™ and highly recommend it for landing pages, checkouts, hosting webinars or broadcasts, and membership sites.

To get a 14-day free trial, use my link and visit clickfunnels.com.

LeadPages Placement

With LeadPages, navigate to edit page.

Click Lead Page Options.

Select Tracking Codes.

And input your base pixel (or standard event code—up next!) into the field called Head-Tag Tracking Code.

2 Conversion Tracking Pixel Modifications

To track valuable actions people take on your website and then optimize your ads for those actions, we’ll Track Conversions With Standard Events.

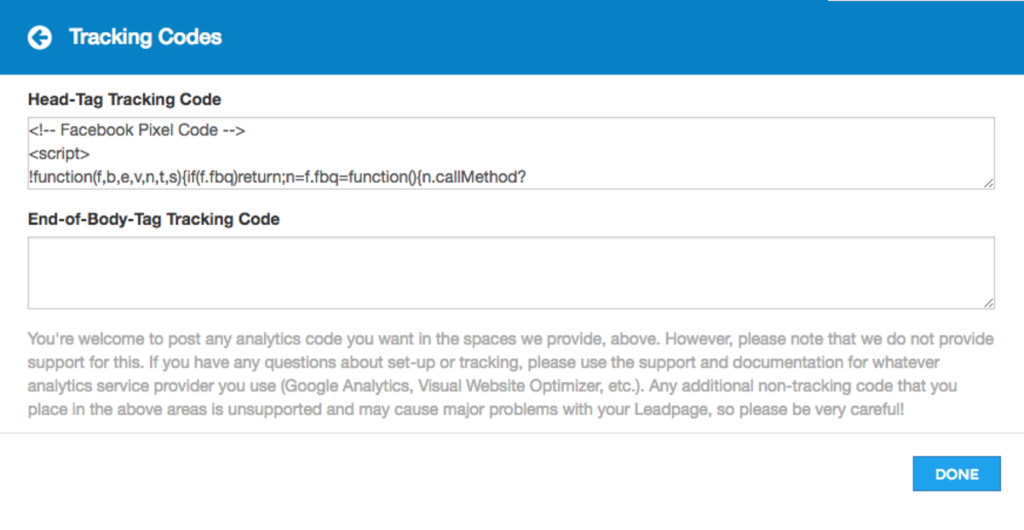
There’s a section of your Facebook pixel that is customizable. You can simply add one extra line of HTML code and then Facebook will understand what happened on the URL page.

For example:

  • Someone registered for your webinar
  • Subscribed to your freebie opt-in
  • Watched a video on your website
  • Made a purchase.

Depending on what you want to track, these customizable standard events will only go on a few specialized pages of your site. NOT THE WHOLE SITE (like the base pixel did).

There are 17 different standard event types you can choose to track… But for now, we’ll focus on Complete Registration and Purchase.

Complete Registration

This tells Facebook when someone has registered for something on your site and completed the process.

It could be registering for a webinar or someone who opts in to your lead magnet (freebie) with their email address.

We’ll place this pixel with the Complete Registration additional line of code on all of the pages that people land on AFTER they take your desired action.

For a webinar registration, it would be on the thank you page a user will land on after submitting their email address.

Purchase

Purchase tells Facebook when someone has bought something from you and what they paid for it.

This could be a small purchase of a low priced tripwire offer or a larger purchase like your online training program, or coaching package.

We’ll place this pixel with the Purchase additional line of code on all Successful Payment pages AFTER checkout.

This is the page your visitors see directly after the purchase transaction is complete.

Now You Have 3 Total Versions of Your Pixel

So think of it like this…

You’ll have three versions of your pixel:

  1. One is the base HTML code of the pixel. This is used EVERYWHERE.
  2. The second is the base HTML code pixel PLUS the additional line of code for tracking completed registrations. This is used on the thank you/confirmation page after someone has subscribed to your email list, registered for a webinar, or any other FREE type action to build your list.
  3. And the third is the base HTML code pixel PLUS the additional line of code for tracking Purchases. This is used on your Completed Purchase confirmation pages.

Testing Your Pixels

So now that you’ve got your pixel across all the pages on your website, you’re feeling pretty awesome, right?

And you should!

But, one last thing before you move on… it’s REALLY important to make sure the pixels WORKING properly, and tracking what you think they track.

Luckily, that part is pretty easy.

Enter the Facebook Pixel Helper plugin for Chrome from Facebook. It’s a small icon that sits on your Chrome menu bar.

Navigate to ANY page where your pixel is installed.

And if you pixel is present, it will be blue and give you a confirmation message:

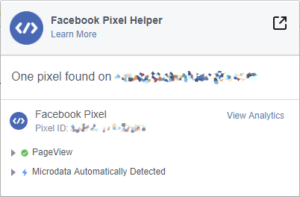
If a pixel is missing, the icon remains grey.

It’s always working in the background to confirm where pixels are installed across the web.

Note: You can only install this goodie if you use Google’s Chrome browser—which I recommend.

Err… another note: Adblocker plugins have been known to interfere with the Facebook Pixel Helper.

Pixel Mastery Takes Time

We made it to the end of the post and you’re on your way to mastering the Facebook pixel in all its glory.

Be patient with yourself during this process because the pixel has a large learning curve.

If you have any additional questions on using the Facebook pixel, leave a comment below and we’ll continue the conversation.

Happy Converting!
Bond